(This tutorial is for Blogger only, Wordpress does not support any Etsy Mini code)
For more information on using your Etsy Mini:
Part 1 - What is an Etsy Mini? How to build an Etsy Mini
Part 3 - How to post an Etsy Mini on your Facebook Page
Part 4 - How to tweak the Etsy Mini HTML code so you can feature other artists.
How to put an Etsy Mini in a blog sidebar
Blog sidebars are narrow, so you need to make sure that the Etsy Mini you build to go here is only one column wide for gallery size images or 2 columns wide for thumbnail size.
1) Once you have built the mini you want to use, copy the Javascript code (the top box) and save it in a text document. Alternatively you can just keep your Etsy mini builder open in a separate tab/window so you can come back to it later.
2) Log into Blogger
3) Click on "Dashboard"
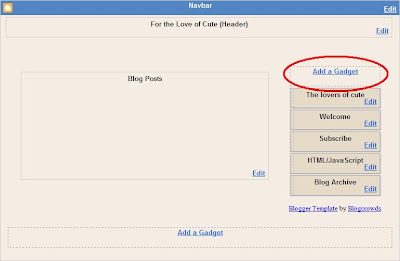
4) Click on "Layout" this will take you to the customize page of your blog.
5) Click on "Add a Gadget"

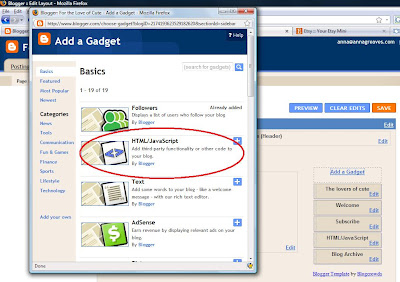
6) A selection of Gadgets for your blog will pop up. For the Etsy Mini you need to select "HTML Gadget"
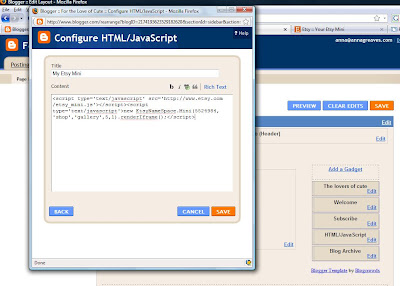
 7) In the next window give your Etsy Mini a name (optional), paste your JavaScript code into the main box and click "Save".
 8) You can move your Gadgets around by clicking and dragging them. When you are happy with your layout just click "Save"
- You can add multiple Etsy minis to the same gadget if you want, just paste more code underneath the first. However I think it works better to create a new html gadget for each Etsy mini, it makes it much easier when you want to move things around on your blog.
How to put an Etsy Mini in a blog post
1) Log into your blog and then click "New Post"
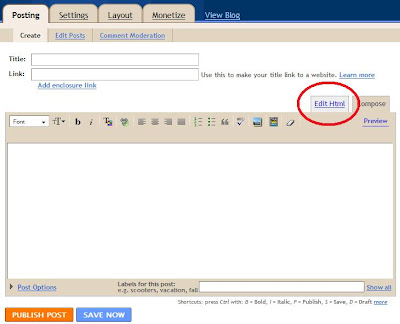
2) Then Click the "Edit HTML" tab
 3) Paste the JavaScript code for your Etsy Mini into the box. If you click the "compose" or "preview" tab you wont be able to see your Etsy Mini. This is ok, just so long as the code is in your "Edit HTML" tab you will be able to see it on your blog when it is published.
For more information on using your Etsy Mini:
Part 1 - What is an Etsy Mini? How to build an Etsy Mini
Part 3 - How to post an Etsy Mini on your Facebook Page
Part 4 - How to tweak the Etsy Mini HTML code so you can feature other artists.


Thank you for this how-to! I just opened my etsy store and couldn't figure out how to get the etsy mini on my blog, now I know and it looks great!
ReplyDeletethanks so much for this. Do you know what to do with the etsy mini so that it doesn't update when you add more favourites. does that make sense. I put an etsy mini up on my blog post of halloween costumes, but then when i added more favourites, it was changing the etsy mini. i want to keep it fixed to certain favourites. I hope that makes sense.
ReplyDeleteHi Len - You can't "fix" an etsy mini to only show certain favorites. They are designed to update every time you add more. The only way I can think you could do this is to make a screenshot of it and then post it as a photo instead of a real mini. Of course then it would not be clickable like a real mini is.
ReplyDeleteThank-you, Thank-you, Thank-you........
ReplyDeleteI spent all night trying to get my mini on.
Went to etsy forums and someone linked to u.
Thanks again to all involved.