Home..........About..........Online Shop..........Etsy Shop..........Folksy Shop..........Newsletter....

Showing posts with label how to. Show all posts

Monday, January 11, 2010

Etsy Sellers tips – Custom orders


The world of custom orders is a tricky one for any Etsy seller, because we enter the minefield of creating something unique to a buyers design specifications. We hand over some or all of the creative control to our buyers, who are often unaware of the limitations of our craft and the time that their items take to create.

I know of many Etsy sellers that have fallen foul of custom order requests gone wrong: Where buyers expect way too much for no increase in price, or when communications have not made it clear exactly what they want before the seller starts work, causing sellers to redo items over and over wasting precious time. The steps below are designed to help you work out the kinks of your custom order process so both you and your buyer are clear on exactly what you expect from each other, hopefully meaning that you both come out happy with your transaction.

1. Talk to your buyer about what they want.
Colors, sizes, design features etc. Ask for images or links for reference if applicable and make sure you get as much information as possible. If your buyer asks for a quote at this point give them a ball park figure if you can, but be clear that until you have decided on ALL the details you can’t give them a specific price.

2. Be honest about what you can and cannot do.

Sometimes buyers assume your craft is capable of things that are just not possible! Be honest with your buyers about what you can and cannot do, it is much better for the both of you if your design specification is achievable right from the beginning. If your buyer sets a low budget, be clear with them about what you can accomplish for their price range.

3. Write up a clear design specification.

When you are sure you have all the information you need: Write up a clear design specification. It sounds so simple and yet it is very easy to get crossed wires even at this early stage, especially if you have had several convos already and important information has to be sifted out.

Write out all the details you have discussed and put it all in one place, give them a price based on this information. Ask your buyer to check it and if they make any changes make sure you adjust the price accordingly if you need to.

Include the shipping cost and the time it will take you to complete the order in your design specification as well. Overestimate the time it will take you by about 20%, this gives you some wiggle room should unforeseen things happen, and if you get it done before you said you would this will make your buyer even happier.

It is a good idea include small piece of text making it clear that changes to the design specification later will incur additional costs, if your buyer keeps changing their minds and costing you time then it is fair that it should cost them more money. Make sure they are aware of this when they are confirming their design specification.

4. Ask for payment before you start work.
You don’t have to ask for all the money before you start, but a partial payment of 50% is more than acceptable. Most professional businesses require 100% payment before they start on an order, and I see no reason why an Etsy seller should not ask for the same.

Some sellers prefer not to take this approach, and of course the decision is up to you. If the item you are making could be sold in your store as a non-custom item then you might choose to risk it and not ask for payment ahead of time, then should something happen you could place it in your store to resell later. However if you are making something that you could not resell, I would highly recommend that you ask your buyer to make some kind of financial commitment before you start work. This is a common policy for most professional businesses.

5. Set up a listing on Etsy so that your buyer can pay
Include the whole design specification (omitting any personal information that the buyer does not want to share). By doing this you receive payment as well as having a new transaction and feedback options.

6. Keep the lines of communication open as you work
When you wrote out the design specification you set a timetable for the work to be completed. If the work will take more than a week, make sure you keep your buyer up to date on how their item is coming along. If you are having difficulties you did not foresee (such as materials out of stock from your local craft store, or technical problems with some of the design specifications) make sure you keep your buyer informed. Buyers would much rather know about things like this ahead of time than be surprised with them later on. Managing their expectations in important for your customer service record. You don’t need to send a convo every day, but a quick update once a week will really help your buyer feel as if something is happening.

7. Send photos of the completed item to your buyer
Give them the opportunity to suggest any changes they would like you to make. If the changes they want are significantly different from your original design specifications and will cost you more time to do, then make them aware what extra cost they will need to pay to cover this.

If the buyer does request changes repeat step 7 until they are happy with their item.

8. Get the rest of your payment
If you took partial payment before you started work, ask for the rest of it now before you ship the item off.

9. You’re done!
Ship off their items promptly and make sure to let them know how long it should take to arrive.

It helps to write about your custom order policies in the Policies section of your Etsy Store, you can then direct your buyers to read this section as you start convoing about a possible order. Include information on possible costs, construction times, additional charges to changes in the design specifications, when payment is due etc. The more information you include the better your customer will know what to expect from you, and the more protected you are should something go wrong. For example if a buyer claims that they did not know changes that require more work on your part would cost them more money. If it is there in their policies, and you have been clear about it in convos they do not have a leg to stand on.

So many of us rely on custom orders for a large proportion of our income, and many new sellers on Etsy inadvertently allow buyers to walk all over them. Buyers that demand a great deal of work from a seller for a low budget often get a very good deal while the seller is left running in circles for a pitiful amount of money. Don’t allow your need for more sales cause you to undersell what you do.

Summary:

1. Talk to your buyer about what they want.
- Colors, sizes, design features etc.
- Collect together links, images and any other reference material.
- Give a ballpark figure on cost if requested

2. Be honest about what you can accomplish, especially if a low budget it set.

3. Write up a clear design specification and ask your buyer to check it.
Include:
– All the details you have discussed, colors, sizes, design features, links, images and reference material etc
- Total price for the work including the Shipping cost
- Time it will take you to complete the order
- Be clear that major changes to the design speciation will cost the buyer more money.

4. Ask for payment before you start work.
- Partial or full payment, however you decide to do this.

5. Create a special listing in your Etsy store so your buyer can pay. Include the whole design specification in the description. (Remember to protect your customers privacy, remove any personal information like names, addresses etc from the listing description)

6. Keep the lines of communication open.
- Keep your buyer up to date once a week on how things are progressing.
- Let them know if you are having any difficulties with their order, especially if this will affect the construction time.

7. Send photos of the completed item to your buyer.
- Ask for their opinion and any changes they might want.
- If they want changes that are significantly different to the design specification and will cost you more time then give them a quote for the additional work.
- repeat step 7 until your buyer is happy with their order.

8. If you took partial payment before you started work, ask for the rest of it now before you ship the item off.

9. You’re done! Ship off the item promptly.

Sunday, November 8, 2009

How to use a Lightbox and photo editing software to make beautiful photographs

Great photos are one of the most important things to get right if you sell online. Your photographs are your virtual shop window: If they are not light, bright and eye-catching then often buyers will surf right past your store without even noticing your work. Really beautiful photographs will bring buyers through your virtual door and keep them there long enough to remember your creations.

These photography tips are designed to help you make your photographs looks bright, eye catching and professional and you don't need to have an expensive camera to do this!

This tutorial comes in two parts:
  1. How to make a Light Box
  2. How to edit your photos to make them pop
I use both processes for all of my photographs.

Part 1: How to make a Light Box
These tips are one way of taking great photos, but they are certainly not the only way. I hope that you will be able to use this tutorial as a starting point and gain the confidence to make photographs with your own style.

First select a box that is the right size for what you want to photograph. For small items like jewelery a box about 30cm wide or 1 foot is good, although if you want to photograph larger items you will need a larger box.


Cut out the top of the box and the front, leaving a bar across the top to help your box keep it's shape


Line your box with white paper, making a curve with paper in the back horizontal corner so that it won't show up in your background.


Make sure you put white paper on the sides too, this will help to bounce the light around even more and make your photographs really bright.


To avoid any lines in your photographs, use a large piece of paper for your backdrop, I love to have a white background so I am using a piece of A3 white card, but you can use any color you like. You can also use fabric if you prefer.


Stick or pin your background in place,
again making a curve in the horizontal corner.


Your light source should be 2 adjustable lamps with daylight light bulbs, 100watts will get a great result. Daylight light bulbs are best because the colors in your photographs will be more accurate than if you use a regular yellowish bulb. Daylight light bulbs look bluish when they are not on. You can get daylight light bulbs from any good electrical store, some art supply stores also stock them as painters prefer to use them too.


Arrange your lamps on either side of your light box, if the stands poke under your box -as they do in mine - then stand your box on some books to make it flat. Some people prefer to just use one lamp, but I find using 2 will eliminate all shadows and shows up the details on your work much better.


As you can see, when the bulbs are on the light bounces around in the box in all directions! Perfect for taking bright photographs


If you have a tripod for your camera then set it up in front of your light box, if you don't have a tripod then add one to your christmas list! For now you can stand your camera on something to balance it.

The reason for the tripod is that you don't want to be using the flash on your camera. If you turn off the flash on some cameras then any photographs taken with the camera in your hands will look shaky, the tripod will keep it stable and make your photos nice and clear.

Finally your light box is ready! Place your items in your light box, switch on your lamps, arrange your camera (remember to switch off your flash) and take some photographs!

Every camera is different, some of you may find that you are happy with the photos you get just from the light box. But if you are like me you will still want to make them brighter. Part 2 explains how to do this...

Part 2: How to edit your photos to make them pop
So you have your photos from your light box, but they are still a little dark and dreary. This tutorial will show you how to edit your photos to brighten them up and make them really pop!

To do this you will be using the "levels" tool that is found in almost every photo editing software. I will be using Photoshop for this tutorial. If you don't have any photo editing software then I recommend you try picnic which is a free and simple photo editing site (to get to the levels tool on picnic: upload a photo, then click "exposure" and then "advanced").

To open the levels tool in Photoshop, click the "layer" menu then "new adjustment layer" and select "levels", then click "ok" to open the tool.


The levels tool looks like a graph or histogram. By using the dropper feature and sliding the arrows around you can create different effects, including lightening up your photographs.

Use the dropper feature to select the lightest color in your photograph. (The dropper does not appear on the picnic website, but it will appear in Photoshop and a few other photo editing programs.)

The dropper is the 3 little icons in the bottom right corner of the levels too. You can use these to select the darkest, lightest and medium tones from your photograph. For my purposes I only want to use the lightest one (on the far right) but feel free to play around with them to see the affects you can get.


Select the white dropper and then click it on the lightest part of your photograph. You can keep choosing a new part until you are happy with the result. As you can see, I have selected the brightest area of my background. This will automatically readjust the photograph.

Next you can also use the arrows on the slider under your histogram to lighten or darken your photograph further. If you are using picnic then this will be your main way to lighten your photographs. Click the arrow in the middle of your histogram and slide it to the left and right to see the results

Slide it to the left to lighten your photograph


Or slide it to the right to make it darker


I just want to lighten my photograph slightly so that you can pick out the details in the Cellist Mouse's skirt. When you are happy with your adjustments click "ok"


If you are using Photoshop, you will need to "flatten" your image before you can save your document as a .jpg . To do this select the "layer" menu and click "flatten image" you are now free to save your file. Feel free to crop your image if you want to before you save.

Here is what my photograph looks like before and after using Photoshop to brighten it up...


Wednesday, May 27, 2009

Etsy Sellers tips - Shop Policies

A frequently overlooked part of an Etsy store is the policies section. Your store policies tell your customers what to expect from you. I am always sad when I see a store with no policies, because I know it is costing them sales. Customers look at your store policies to judge what kind of customer service you will offer; if there is nothing there they are likely to walk away.

Shop policies do not only help your customers but they also help the store owner stay consistent and have actions in place for certain situations.

You can find the page to edit your policies buy logging in to Etsy, click "your Etsy" and look for the "policies" link in the left hand column, click it.

Here are some things to consider when writing your store policies.

Welcome
  • You don't need to put a lot of information here, any personal information you want to share can be put in your profile. A brief introduction is fine here and you can encourage buyers to contact you if they have any questions.
Payment
  • State what methods of payment you will take (PayPal, cheque etc)
  • If you take PayPal, a brief description of how to pay with PayPal is useful. Lots of people don't realise they can use this method to pay with their credit or debit card without having to sign up for a PayPal account. It helps to explain how they can do this. This is what I say in my policies, you can copy and paste it if you want
"You do not need a PayPal Account to pay for your items through PayPal:

You can choose the PayPal Option during checkout. After you submit your order click the "Pay Now" button. Scroll Down and you will see the option to pay with a Credit or Debit Card WITHOUT having to sign up for a PayPal account."
  • State that you will not send packages until payments have cleared.
  • Encourage buyers to contact you if they are having any problems with payment
  • Tell your buyers what you will do in the event of non-payment. Non-payment is a common problem on Etsy, part of this is down to the way the system works there and it can be confusing to new buyers on Etsy, other times people are just messing you around. This forum post has some great advice on how to deal non-payment, but it helps to leave something about it in your policies too. Will you leave negative feedback for non-payment and no-response to emails? I do, but it is a personal choice. Whatever you decide, put it down in your policies. It will make it easier for you to follow through on it when non-payment happens to you.
  • If you offer payment plans explain how this works to your customers.
Shipping
  • Describe how your items are packaged: Do you gift wrap? Are your items sent in boxes? Do you include a certificate of authenticity? If you use recycled packaging write that in here too, Etsy buyers love sellers who do this.
  • Tell your buyers what shipping company you use.
  • What shipping do you offer? (priority, standard, first class, registered mail, online tracking?)
  • Can customers request faster shipping or insurance for an additional charge? If yes, ask them to contact you for more information.
  • If the Etsy and PayPal shipping addresses you receive for an order are different, what will you do? Some stores state if they have had no contact from the buyer within 3 working days then they will ship to the PayPal shipping address. Other sellers clearly say that they always ship to the address given during Etsy checkout. Decide which you will do and state it here (I used to say I would contact the buyer to confirm if their addresses were different, only once did the buyer say they wanted it shipped to their PayPal address, all others said the Etsy one. So now I always ship to the Etsy address, no more waiting around for buyers to get back to me) If you will automatically ship to a certain address make sure you include info on this in your "message to buyer" box as well.
  • Give information on estimated shipping times. If you have already done a lot of shipping you will have a good idea of how long a package takes to arrive in certain parts of the world. If you have not done much shipping yet, ask at your post office, and then add a few days to their estimated times. Packages almost always take longer to arrive than the PO says they will.
  • If you ship overseas, state that customs can delay packages by up to 6 weeks, say that this does not happen often but that it can happen. It is better to forewarn your buyers about this possible problem.
Refunds and Exchanges
  • If you don't want to do refunds and exchanges then put it politely. Something like "I'm sorry but at this time [insert shop name here] cannot accept refunds or exchanges, please purchase seriously" comes across a lot better than "No exchanges or refunds accepted"
  • If you are going to offer refunds and/or exchanges then put your terms and conditions here. How long after receiving an item can people ask you for an exchange or refund? Will you refund only the cost of the item or the shipping as well? If a buyer returns an item to you who is responsible for the return postal costs?
Additional Policies and FAQs
  • This is a great place for any custom order policies you have. If you take custom orders then you can talk about the process you go through for these orders.
  • An estimate of how long an order will take is good here, if it varies a lot then ask buyers to contact you for more information.
  • When you require payment. I recommend you at least take a deposit before starting work, unforeseen things can happen that may mean your buyer cannot pay you by the time you have finished working (this has happened to me in the past, I now require full payment before I start work)
  • Frequently Asked Questions, is pretty self explanatory. If you have some questions that you are always getting asked then this is the place to put them down with your answers. This won´t stop everyone as some people just don´t look hard enough for the answers, but it will help a few and you can just copy/paste them when you get convos about them.
Other tips for your policies.
  • Run your policies through a spell checker, and get someone else to proof-read them for you if you can. It looks unprofessional if you have spelling and grammar mistakes everywhere.
  • Keep a friendly and polite tone in your policies. Don´t get angry, confrontational or rude when you write them. Be clear and concise without being rude.
  • Re-read your policies as if they belonged to a shop you wanted to buy from. How would you feel as the customer when reading them? Make any changes you think you need.
  • Ask a friend if what you have written makes sense.
  • Sometimes people will write to you with questions about your policies. When this happens take note and if necessary make adjustments to your policies if you think they need it.
Here are my shop policies, I give you permission to copy and paste bits of it you feel are useful. However, make sure you actually agree with what I have written if you are copying it.

Did you find this post useful? Is there anything I left out that you think should be included? For links to other Etsy Sellers Tips I have written check out this page.

Thursday, May 21, 2009

Etsy Mini Part 4 - How to make a Featured Artist Etsy Mini

This is Part 4 of my tutorials on using the Etsy Mini Widget, here I will show you how to tweak the Etsy Mini HTML code so you can feature other artists.

For more information on using your Etsy Mini:
Part 1 - What is an Etsy Mini? How to build an Etsy Mini
Part 2 - How to post an Etsy Mini on your blog
Part 3 - How to post an Etsy Mini on your Facebook Page

It is possible to make an Etsy mini from another store, for example if you wanted to have an “artist of the week” Etsy mini on your blog. The trick is to make an Etsy mini for your own store, in the dimensions and size that you want your featured artist to have on your blog. Then you need to find their user_id and replace yours for theirs.

Here's an example. Let´s say I wanted to make an Etsy mini from this great store I found recently called reclaim2fame.etsy.com. First I would build an Etsy Mini for my own store, making it the size and dimensions I want to show reclaim2fame´s listings in.

This is the code I get for that:

I copy and paste that code into a word document so I can edit it a bit later.

Now, I want to turn it into an Etsy mini for reclaim2fame´s store. All I need to do it look at his Etsy shop Policies page. The url will look something like http://www.etsy.com/shop_...user_id=5932649. The bit I need is his user id 5932649.

So I take the Etsy mini code for my store, and I replace my own Etsy id with his like this:

Code for my storeBecomes Code for reclaim2fame´s Etsy Mini

By using this technique you can create an Etsy mini for any store you like, without needing to convo the seller to ask them to build one for you.

For more information on using your Etsy Mini:
Part 1 - What is an Etsy Mini? How to build an Etsy Mini
Part 2 - How to post an Etsy Mini on your blog
Part 3 - How to post an Etsy Mini on your Facebook Page

Etsy Mini Part 3 - How to put an Etsy Mini on your Facebook Page

This is Part 3 of my tutorials on using the Etsy Mini Widget, here I will show you how to add your Etsy Mini to your Facebook Page.

For more information on using your Etsy Mini:
Part 1 - What is an Etsy Mini? How to build an Etsy Mini
Part 2 - How to post an Etsy Mini on your blog
Part 4 - How to tweak the Etsy Mini HTML code so you can feature other artists.

There are 2 ways to post your Etsy Mini on your Facebook page.
  • Using the Etsy Mini Application. This allows you to show up to 6 items from your store or your favourites. This way is relatively easy to set up.
  • Using the My Stuff Application. This allows you to more of your items in one go. An Etsy Mini of 5x4 looks great here. However it is more complicated to set this up.
Using the Etsy Mini Application
1) Click on this link to go to the Etsy Application Page
2) Click "Go to Application" and then click "Allow"
3) Once you have it installed go to your settings and choose "Application Settings"

4) Select "Etsy Shop" on the list
5) On the next page select "Edit Your Settings"
6) Here you can enter your Etsy Shop name, the number of items you want to show (the maximum is 6, and if you want to show from your favourites or your own store items.
7) When you are happy with your selection, click "Save"


8) You won't be able to see your Etsy Shop application on your profile wall yet. We need to fix this now. To do this go to your profile and click the "Boxes" Tab at the top of the page.

9) Scroll until you find your "Etsy Shop" Application. In the top right corner you will see an icon that looks like a pencil. Click it and select "Move to Wall tab"


10) Your Etsy Shop Application will now have moved to the bar on the left of your profile page. You can move it up and down by clicking and dragging the box around until you are happy with where it sits.


Using the My Stuff Application to put an Etsy Mini on your Facebook Page
1) Build an Etsy Mini that has thumbnail size images and a grid of 5 columns and 4 rows (this size looks best on your facebook page)
2) Copy the Flash Code (second box down) and save it to a word file.

3) Log into Facebook
4) Click this link to go to the My Stuff application
5) Click "go to application" and then "allow"
6) The application will appear on your page blank. At the bottom you will see a Box that says "add code"
7) Paste your Flash Code into this box and click "Add to Profile" to see it appear.

8) You can add multiple things to your My Stuff application, including other Etsy Minis, videos and anything else in HTML format. But when the My Stuff app is on your profile wall it will only show the top item. Therefore it makes sense to make sure your Etsy Mini is at the top.
9) When you are finished go to your Facebook profile. You won't be able to see your My Stuff application on your wall yet. We need to fix this now. To do this click the "Boxes" Tab on your Profile page. If you can't see it try clicking the "+" tab and look for "boxes" if you still don't see it then this is a Facebook bug, you will just have to be patient and come back to it later.

10) Now you have your boxes Tab open scroll until you find your "My Stuff" Application. In the top right corner you will see an icon that looks like a pencil. Click it and select "Move to Wall tab"

11) Your My Stuff Application will now have moved to the bar on the left of your profile page. You can move it up and down by clicking and dragging the box around until you are happy with where it sits.


For more information on using your Etsy Mini:
Part 1 - What is an Etsy Mini? How to build an Etsy Mini
Part 2 - How to post an Etsy Mini on your blog
Part 4 - How to tweak the Etsy Mini HTML code so you can feature other artists.

Etsy Mini Part 2 - How to put an Etsy Mini on your Blog

This is Part 2 of my tutorials on using the Etsy Mini Widget - here I will show you how to add your Etsy Mini to your your blog sidebar and into a post.
(This tutorial is for Blogger only, Wordpress does not support any Etsy Mini code)

For more information on using your Etsy Mini:
Part 1 - What is an Etsy Mini? How to build an Etsy Mini
Part 3 - How to post an Etsy Mini on your Facebook Page
Part 4 - How to tweak the Etsy Mini HTML code so you can feature other artists.

How to put an Etsy Mini in a blog sidebar
Blog sidebars are narrow, so you need to make sure that the Etsy Mini you build to go here is only one column wide for gallery size images or 2 columns wide for thumbnail size.

1) Once you have built the mini you want to use, copy the Javascript code (the top box) and save it in a text document. Alternatively you can just keep your Etsy mini builder open in a separate tab/window so you can come back to it later.
2) Log into Blogger
3) Click on "Dashboard"
4) Click on "Layout" this will take you to the customize page of your blog.
5) Click on "Add a Gadget"


6) A selection of Gadgets for your blog will pop up. For the Etsy Mini you need to select "HTML Gadget"
7) In the next window give your Etsy Mini a name (optional), paste your JavaScript code into the main box and click "Save".

8) You can move your Gadgets around by clicking and dragging them. When you are happy with your layout just click "Save"

- You can add multiple Etsy minis to the same gadget if you want, just paste more code underneath the first. However I think it works better to create a new html gadget for each Etsy mini, it makes it much easier when you want to move things around on your blog.

How to put an Etsy Mini in a blog post
1) Log into your blog and then click "New Post"
2) Then Click the "Edit HTML" tab

3) Paste the JavaScript code for your Etsy Mini into the box. If you click the "compose" or "preview" tab you wont be able to see your Etsy Mini. This is ok, just so long as the code is in your "Edit HTML" tab you will be able to see it on your blog when it is published.

For more information on using your Etsy Mini:
Part 1 - What is an Etsy Mini? How to build an Etsy Mini
Part 3 - How to post an Etsy Mini on your Facebook Page
Part 4 - How to tweak the Etsy Mini HTML code so you can feature other artists.

Etsy Mini Part 1 - How to build an Etsy Mini

This tutorial and the ones to follow will show you everything I know about the Etsy Mini Widget. Part 1 will introduce you to the Etsy Mini and show you how to build one.

For more information on using your Etsy Mini:
Part 2 - How to post an Etsy Mini on your blog
Part 3 - How to post an Etsy Mini on your Facebook Page
Part 4 - How to tweak the Etsy Mini HTML code so you can feature other artists.

What is an Etsy Mini?
The Etsy Mini is a clever little gadget that shows items from your Etsy store, or from your favourites. You can see 3 of them in the sidebars of this blog, for my own store, my favourites and for this weeks featured artist. The code supplied by Etsy allows you to show a little window into etsy, and no matter where you put the Etsy Mini code, it will update itself to show your most featured items, recent items or your favorites.

How to Build an Etsy Mini
To find the Etsy Mini Builder
1) Log on to Etsy
2) Click on "Your Etsy" at the top of the page
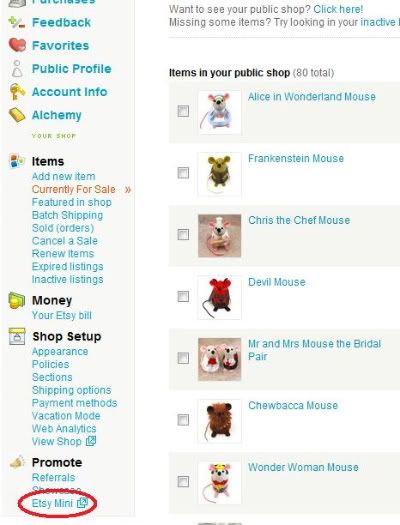
3) You will find the Etsy Mini link at the bottom of the left hand bar

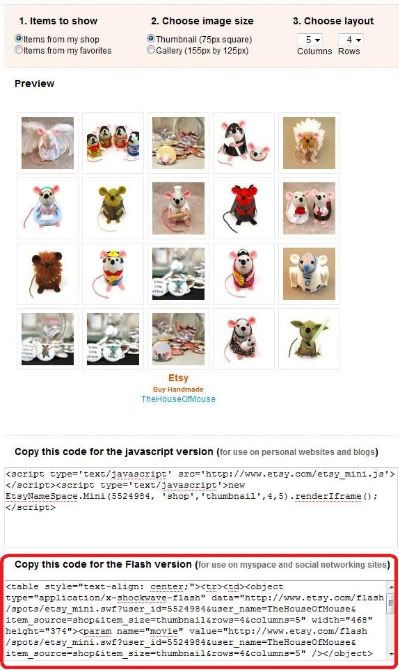
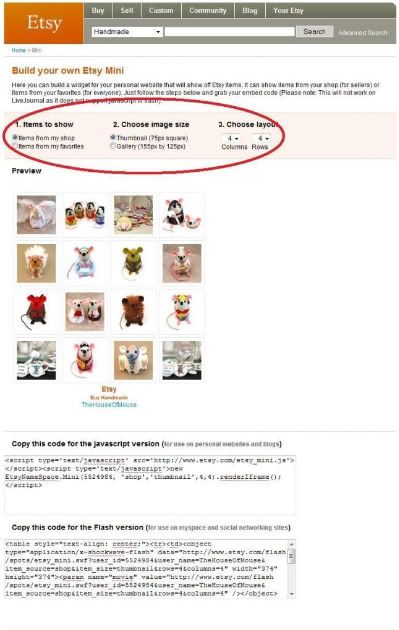
4) The Next page will give you a few options to choose from. You can choose to show items from your store or from your favourites, the size of the images and the proportions of your Etsy mini. 5) When you have made all 3 selections an example of your Etsy mini will show below, you can continue to edit it until you are happy with how it looks.

6) When you are happy with how your new Etsy Mini looks it is time to grab some code. Etsy provides 2 different codes for you to use, depending on where you want to put your Etsy mini. If you are posting the code on a blog then you will need the JavaScript code, if you are posting on MySpace or Facebook you will need the Flash Code instead.

For more information on using your Etsy Mini:
Part 2 - How to post an Etsy Mini on your blog
Part 3 - How to post an Etsy Mini on your Facebook Page
Part 4 - How to tweak the Etsy Mini HTML code so you can feature other artists.

Thursday, April 30, 2009

Etsy Sellers Tip #5 - Featured Items

Below is a tutorial on how to activate and edit the featured items in your store, if you already know how to use this feature then skip to the end of this post where you will find a couple of tips on how to use your featured items more effectively.

How to activate and edit your Featured Items

The featured items in your Etsy store allow you to show off 3 listings of your choice right at the top of your page. Unlike your other listings that are ordered by the date they were listed, these 3 are hand picked by you and seen first by visitors to your store, like a shop window.

To choose your featured items, first log on to Etsy and then click on Your Etsy at the top of the page.


Each of your active listings will be displayed here, you can select a featured item by clicking the star next to it so that it turns green. Choose at least 3 items to feature. When you have made your selection you can rank your featured items by clicking rank featured.

On the next page you can move the listings up an down as you wish. The first 3 items are the ones that will appear on your shop page, if one of them sells then it will disappear from your featured items and the 4th featured item will move up to replace it.


Tips on using your featured items more effectively

Choose more than 3 featured items. This will help you avoid a blank space when one of them sells.


Choose listings that show a variety of prices in your store. For the best effect on your sales choose the most expensive listing, the cheapest listing and one from in the middle. Most customers like to buy a middling price item - not too cheep, not too expensive - and seeing the whole price range easily like this will help them choose quickly. When I started doing this is had an immediate effect on my sales.

Use your featured items to make your Etsy Mini look like a treasury. Did you know that if you have an Etsy mini, the items in it are always from your featured items first, and then from your recently listed ones? This way you can make all your Etsy minis look beautiful no matter if they are on your blog, website, myspace, facebook or anywhere else! Choose a colour theme or show off all the items from a certain section. Change them up often to keep your viewers watching!

Leave me a comment and tell me what you think.
Do you have other tips on using your Featured Items?
I love to learn more!


OTHER NEWS:
I have an exciting announcement to make which you are going to love! But I won't tell you about it just yet... you'll have to come back tomorrow to find out!

Thursday, December 11, 2008

My Top 10 Tips for making a Front Page worthy treasury

Learning to make a great treasury is an art. It is also an important education for any seller who wants to get their work featured on the Front Page of Etsy. If you take the time to learn what makes a treasury worthy of the Etsy Front Page, you will quickly learn how to make your listings the kind that will get chosen for that honor.

Take a look at the Etsy Front Page Flickr group. This is full of screencaps of treasuries that have been on the front page. Notice how each one looks amazing, the photos are top quality and the treasury always has a theme, be it a shape, color or something else.

For those of you who don't know what a treasury is or how to catch one check out this article.

As a seller who was been both curator for and featured in Etsy Home Page treasuries, here are my top 10 tips for making a Front Page worthy treasury.

1) Use the Etsy Poster Sketch.
You can build as many treasuries as you like there, although only you can see them. You can always save your sketches to use when you actually manage to grab a treasury. (bookmark it in your browser because the link to it is hard to find on Etsy)

2) Choose a theme.
The theme can be colour, tone, shape, emotion or anything else you like. You can also pick one listing from your favorites to start with; try to find other listings that match it in some way. Think of your entire treasury as a piece of art, each listing should go well with the others.

3) Use the Etsy Tag Fractal.
you can use the Tag Fractal to search for listings that fit your theme, you can search based on their titles and tags here. It is a great tool. (bookmark this one too)

4) Choose listings that look great as thumbnails.
Take a look at my previous post for further explanation on this

5) Vary the types of listings in your treasury.
Unless your theme is a certain type or category of listing, try to avoid having too many of the same kind of listing in your treasury. For example, not more than 2 pairs of earrings, 2 toys, 2 illustrations etc...

6) Vary the prices of the listings in your treasury.

When Admin choose a treasury for the front page they make sure that the price range varies. they don't want everything to sell out before that front page's time is up. If everything is too inexpensive then the items will sell out too fast and cause technical difficulties for the front page. To read more about what Etsy Admin said about this check out this forum thread

7) Fill up all the alternatives.

When you make a treasury you get 16 slots to show off, but only the 12 on the left can be seen. The other 4 are called the alternatives. If your treasury makes it to the front page then when something sells one of your alternatives will take its place. Admin will only ever choose a treasury that is full, including the alternatives. Make sure your alternatives are just as good as the others.

8) Don't feature yourself.
You are allowed to feature yourself in one listing of your own treasury, but if your treasury gets picked for the front page then your listing will get swapped out for an alternative. From an Admin's point of view you will only have 3 alternatives instead of 4 as they won't ever have the curator of a treasury featured on the FP too. It lowers your chances significantly and it is considered by some to be an "unwritten rule" of making treasuries.

9) Choose an interesting title.

Titles are hard to come up with, so while you are filling your Poster Sketch try to think about your theme and what title would go well with it. A good title will get a few more people clicking on it, just to see what is in there. I should say that Etsy Admin has stated that they don't pay any attention to a treasury title, they are interested in how it looks and the price ranges it includes, so it’s not essential.

10) Promote your treasury
When you have caught a treasury and filled it, tell your friends about it. If you belong to an Etsy Street Team then post it in your team thread. If you are on Twitter then post the link there too. If there are threads in the forums sharing the latest treasuries then post there too... you get the idea. The more views, clicks and comments your treasury gets the "hotter" it becomes and the higher up the treasury list it will go. The more people see that you make great treasuries, the more chances you have of making it on the Front Page one day.

Good luck and happy treasury making!

Tuesday, September 2, 2008

How to get the Etsy sales you want

Improve your shop and learn to promote it. Every bit of information you need is already out there, and most of it is right there on Etsy!

IMPROVE YOUR PHOTOGRAPHS: This is - I think - the most important part (which is why it is at the top and has the most links).
How to use a Lightbox and photo editing software to make beautiful photographs
Achieving Clarity and Crispness in Your Photos
How to Style Your Photos
Photographing for Success
Photograph Your Way to The Top!
Make Your Photos Pop with Histograms and Levels
Using EV and White Balance to Make Your Photos True to Life

FIND A MENTOR - a mentor can help you with the personal disputes you cannot ask about in the forums because of the "calling out" rules. They can also give you great advice from experience on ways to improve your shop and get more out of Etsy. The new Team Etsy Mentors list includes detailed information on the specific areas of expertise our members have, so you can quickly find the right mentor to help you.

LEARN TO PRICE YOUR WORK CORRECTLY! If you underprice your work viewers will undervalue your creations and be put off just as much as they will be by an overinflated price.
The Art of Pricing

WRITE GOOD DESCRIPTIONS! Help the buyer connect with your work
Making the most of your descriptions

WRITE CLEAR CONCISE POLICIES for your shop that make the customer clear on what they can expect from you.
Hello Policy!

WRITE A PROFILE that sparks interest in your store! Help your customers get to know you.
Crafting a profile page

LEARN TO TAG EFFECTIVELY! Tagging is how your buyers (and treasury curators) find you! Remember to tag for colors too as those are the most common tags curators use when looking for treasury listings.
Tagging on Etsy
International Tagging

PROMOTE YOUR SHOP! If no one knows you are there then they can’t see your beautiful creations. Learn to shout about what you do.
Pimp Your Shop
The Ultimate Craft Guide

STAY POSITIVE! Maintain a positive, friendly & helpful attitude in the forums -- a cheerful face is more likely to be remembered and added to treasuries than a grumpy one! Negative attitude in the forums affects the way people view you and your shop. Branding is not just about a logo, it is about everything you do in connection with your store. Many visitors to the forums actively avoid aggressive, whiny or rude members and their stores.

JOIN A TEAM! Teams help to promote their members and are also a great resource for honest advice about your shop. Teams often make treasuries featuring their own members. Take the time to be part of a supportive community!
Etsy Teams

BE UNIQUE! Find a way to make your product different from your competitors. Even if you are selling the same thing as 1,000 other people, you can still find a way to stand out from the crowd.
Book: Purple Cow: Transform your business by being remarkable
Blog: Make a great product

CONTINUALLY RE-EVALUATE YOUR STORE! Even if things are going well, there is always something that can be improved.
An outline to self critique your shop

SIT IN ON A WEEKLY CRITIQUE! Even if you don't get critiqued you can learn a lot just from sitting in, watching and listening. Check the virtual labs schedule to see when the next ones will be.
Virtual Labs Schedule

READ THE NEWBIE GUIDES – even if you are not a newbie! They are full of useful links and tips.
The Ultimate Newbie Guide
A Beginner's Guide to Starting a Shop on Etsy

OTHER GREAT RESOURCES:

Ultimate Craft Guide - tutorials, advice, suppliers....

Storque how tos

How to make it to the front page

TIPS FROM OTHER ETSIANS:

jealousydesign.etsy.com says:
"When I relist something I change the #1 picture. have noticed that some items that had almost no hearts or views before can get much more after this little change....."

nyblaque.etsy.com says:
"I always change up my "Featured Item" photo in my shop every other day. To keep things looking fresh on Etsy and on my Etsy Mini, I have my Etsy Mini on facebook, myspace blogspot..etc. I usually, change them and/or make a theme out of them.. like all necklaces, or one color, brand new listings, etc.... kinda makes a person go" oo I didn't see those on her mini last time". I just got a sale yesterday from a buyers who told me she reads my blog and saw my new items in my Etsy Mini!! COOL:)"

Popular Posts