Home..........About..........Online Shop..........Etsy Shop..........Folksy Shop..........Newsletter....

Showing posts with label shop. Show all posts

Friday, January 15, 2010

Last chance to buy from The House of Mouse


Hi everyone! I just wanted to let you know I will be closing my store on Sunday so I can take some time off before our baby boy is born. I hope to reopen in the summer once I know how much time I will have for The House of Mouse while being a full time mommy.

Just letting you know in case you want
to grab a mouse before I close shop for a while.

I also want to say a big thank you to everyone for all your support, and to all my wonderful customers for giving so many of my mice new loving homes. In the summer I will be back with lots of new designs and more silly mouse fun.

I will keep blogging when I can, and you will certainly get to see photos of our boy when he is born! Keep watching this space for more info!

Hugs and cookies,
Anna

The House of Mouse

~

Sunday, November 22, 2009

8,000 hearts!

Marking another milestone on my Etsy journey. Today I hit 8000 shop hearts. Thank you to everyone who has given my store so much love, your encouragement keeps me going every day!

Saturday, June 6, 2009

Artist Interview - We've Got Paper

This weeks featured artist is We've Got Paper, Julie's shop makes me want to get out an old fashioned pen and paper and write a letter to someone special. Not only are is her letter sets beautiful and her photographs stunning, but she is such a sweet and bubbly personality too.

Tell us a bit about yourself.
Hello, bonjour! My name is Julie Trévily-Pigeon and I’m a 29 year old mom, stationery designer and sushi addict. I live in Québec, Canada and I speak French. I have a 4 year old son named Louis-Justin who says the most adorable things. He’s witty and creative, like his mom!

I had my first penpal when I was 7 years old. My friend moved away and we started writing to each other. We thought that our letters were fabulous, but looking back I can say that they were rather short and boring!

A few years later, I started writing letters more seriously to people around the world that I met through various penpal clubs. I was also introduced to friendship books, slams and decos. I was into swapping for years, but in the end I decided to focus solely on letter writing.

I love my "real life" friends, the ones I can meet face to face on a regular basis, but penpals have a special place in my heart. It’s magical to find a handwritten letter in your mailbox, to read about someone’s dreams, hopes, goals, fears and rituals…

I currently have about 15 penpals and I’m pretty close to most of them. Some of them I’ve been writing to for less than a year, one of them I’ve known for over 17 years! And I even met 3 of them! (One who lives in Canada, one in Belgium and one in Brazil.)

About two years ago, I decided to combine my love of penpalling with my love of paper and I started designing letter sets. I’m always happy when people buy stationery from me because it means that the art of letter writing is not dead! A lot of people prefer email because it’s faster, but there are still a lot of us who write letters the old-fashioned way.

Other than crafting what else do you do?
I write letters, eat sushi, spend time with my son (we’re going to start homeschooling soon), watch movies and series, listen to music and sing along (mostly off key), go on picnics with friends, take photos, invent new words, think about stationery, talk about stationery, dream about stationery, spend time with my boyfriend (not necessarily in that order).

Have you always been an artist?
I’ve always been interested in art. I see beauty everywhere : nature, words, music, movies, artists inspire me.

When I was younger, I used to write short stories (in French) and I played the trumpet in high school. I’ve always admired artists who could draw or paint but I unfortunately have no talent whatsoever in that area. So for my stationery, I mostly use photos that I take and artwork that I especially like. I love to support artists and am happy to feature their illustrations on my letter sets.

Tell us a bit about your creative process.
I mostly work in front of my computer in my bedroom while listening to music. (You can see what I listen to on Last.fm

I design most of my letter sets in Photoshop, but I like textures too so I sometimes start with real paper and finish with Photoshop, which is what I did with my Pinup Notecards.

Where did you learn your craft? Are you self taught?
I am! At first, my son’s dad (who I’m still excellent friends with even though we've been separated for over 2 and a half years) showed me the basics of Photoshop. I had no background in design, no knowledge about it, but when I have something in mind, don’t try to stop me! I wanted to make letter sets so I found how. My designs are simple, but I’m proud of the fact that I learned everything by myself.

Which of your creations is your favourite?
I love Swirly Ivy because it was one of the first letter sets that I designed. I didn’t have a lot of experience with Photoshop then, so it took me hours to get it to look exactly like what I had in mind. It also is a best seller in my shop, so it seems that I’m not the only one who likes it!
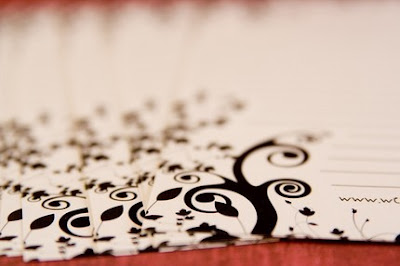

I also love my Cherry Grocery List… And my Panda Girl letter set / notepad and pen set. I can’t pick just one thing!

What is your number one tip for handmade sellers?
Perseverance! If you’re passionate about what you do, you can go far! Don’t give up if something doesn’t work immediately! Just keep trying and experimenting until you get results. My business wasn’t very successful for the first year and a half, but has been growing steadily for the last 6 months. You have to be in the right mindset and believe in yourself. Visualize that you’re getting a sale and everytime you do get one, get up and do a happy dance! Scream, sing, jump up and down! Celebrate every little victory!
Where can we find you online?
My Etsy shop : wevegotpaper.etsy.com
My blog : wevegotpaper.blogspot.com
My profile on InterPals
(InterPals is a wonderful website if you’re interested in finding new penpals!)

Thanks everyone! Now go write a letter – it will be fun and you’ll be sure to brighten someone’s day!

Julie xox

Wednesday, May 27, 2009

Etsy Sellers tips - Shop Policies

A frequently overlooked part of an Etsy store is the policies section. Your store policies tell your customers what to expect from you. I am always sad when I see a store with no policies, because I know it is costing them sales. Customers look at your store policies to judge what kind of customer service you will offer; if there is nothing there they are likely to walk away.

Shop policies do not only help your customers but they also help the store owner stay consistent and have actions in place for certain situations.

You can find the page to edit your policies buy logging in to Etsy, click "your Etsy" and look for the "policies" link in the left hand column, click it.

Here are some things to consider when writing your store policies.

Welcome
  • You don't need to put a lot of information here, any personal information you want to share can be put in your profile. A brief introduction is fine here and you can encourage buyers to contact you if they have any questions.
Payment
  • State what methods of payment you will take (PayPal, cheque etc)
  • If you take PayPal, a brief description of how to pay with PayPal is useful. Lots of people don't realise they can use this method to pay with their credit or debit card without having to sign up for a PayPal account. It helps to explain how they can do this. This is what I say in my policies, you can copy and paste it if you want
"You do not need a PayPal Account to pay for your items through PayPal:

You can choose the PayPal Option during checkout. After you submit your order click the "Pay Now" button. Scroll Down and you will see the option to pay with a Credit or Debit Card WITHOUT having to sign up for a PayPal account."
  • State that you will not send packages until payments have cleared.
  • Encourage buyers to contact you if they are having any problems with payment
  • Tell your buyers what you will do in the event of non-payment. Non-payment is a common problem on Etsy, part of this is down to the way the system works there and it can be confusing to new buyers on Etsy, other times people are just messing you around. This forum post has some great advice on how to deal non-payment, but it helps to leave something about it in your policies too. Will you leave negative feedback for non-payment and no-response to emails? I do, but it is a personal choice. Whatever you decide, put it down in your policies. It will make it easier for you to follow through on it when non-payment happens to you.
  • If you offer payment plans explain how this works to your customers.
Shipping
  • Describe how your items are packaged: Do you gift wrap? Are your items sent in boxes? Do you include a certificate of authenticity? If you use recycled packaging write that in here too, Etsy buyers love sellers who do this.
  • Tell your buyers what shipping company you use.
  • What shipping do you offer? (priority, standard, first class, registered mail, online tracking?)
  • Can customers request faster shipping or insurance for an additional charge? If yes, ask them to contact you for more information.
  • If the Etsy and PayPal shipping addresses you receive for an order are different, what will you do? Some stores state if they have had no contact from the buyer within 3 working days then they will ship to the PayPal shipping address. Other sellers clearly say that they always ship to the address given during Etsy checkout. Decide which you will do and state it here (I used to say I would contact the buyer to confirm if their addresses were different, only once did the buyer say they wanted it shipped to their PayPal address, all others said the Etsy one. So now I always ship to the Etsy address, no more waiting around for buyers to get back to me) If you will automatically ship to a certain address make sure you include info on this in your "message to buyer" box as well.
  • Give information on estimated shipping times. If you have already done a lot of shipping you will have a good idea of how long a package takes to arrive in certain parts of the world. If you have not done much shipping yet, ask at your post office, and then add a few days to their estimated times. Packages almost always take longer to arrive than the PO says they will.
  • If you ship overseas, state that customs can delay packages by up to 6 weeks, say that this does not happen often but that it can happen. It is better to forewarn your buyers about this possible problem.
Refunds and Exchanges
  • If you don't want to do refunds and exchanges then put it politely. Something like "I'm sorry but at this time [insert shop name here] cannot accept refunds or exchanges, please purchase seriously" comes across a lot better than "No exchanges or refunds accepted"
  • If you are going to offer refunds and/or exchanges then put your terms and conditions here. How long after receiving an item can people ask you for an exchange or refund? Will you refund only the cost of the item or the shipping as well? If a buyer returns an item to you who is responsible for the return postal costs?
Additional Policies and FAQs
  • This is a great place for any custom order policies you have. If you take custom orders then you can talk about the process you go through for these orders.
  • An estimate of how long an order will take is good here, if it varies a lot then ask buyers to contact you for more information.
  • When you require payment. I recommend you at least take a deposit before starting work, unforeseen things can happen that may mean your buyer cannot pay you by the time you have finished working (this has happened to me in the past, I now require full payment before I start work)
  • Frequently Asked Questions, is pretty self explanatory. If you have some questions that you are always getting asked then this is the place to put them down with your answers. This won´t stop everyone as some people just don´t look hard enough for the answers, but it will help a few and you can just copy/paste them when you get convos about them.
Other tips for your policies.
  • Run your policies through a spell checker, and get someone else to proof-read them for you if you can. It looks unprofessional if you have spelling and grammar mistakes everywhere.
  • Keep a friendly and polite tone in your policies. Don´t get angry, confrontational or rude when you write them. Be clear and concise without being rude.
  • Re-read your policies as if they belonged to a shop you wanted to buy from. How would you feel as the customer when reading them? Make any changes you think you need.
  • Ask a friend if what you have written makes sense.
  • Sometimes people will write to you with questions about your policies. When this happens take note and if necessary make adjustments to your policies if you think they need it.
Here are my shop policies, I give you permission to copy and paste bits of it you feel are useful. However, make sure you actually agree with what I have written if you are copying it.

Did you find this post useful? Is there anything I left out that you think should be included? For links to other Etsy Sellers Tips I have written check out this page.

Thursday, May 21, 2009

Etsy Mini Part 4 - How to make a Featured Artist Etsy Mini

This is Part 4 of my tutorials on using the Etsy Mini Widget, here I will show you how to tweak the Etsy Mini HTML code so you can feature other artists.

For more information on using your Etsy Mini:
Part 1 - What is an Etsy Mini? How to build an Etsy Mini
Part 2 - How to post an Etsy Mini on your blog
Part 3 - How to post an Etsy Mini on your Facebook Page

It is possible to make an Etsy mini from another store, for example if you wanted to have an “artist of the week” Etsy mini on your blog. The trick is to make an Etsy mini for your own store, in the dimensions and size that you want your featured artist to have on your blog. Then you need to find their user_id and replace yours for theirs.

Here's an example. Let´s say I wanted to make an Etsy mini from this great store I found recently called reclaim2fame.etsy.com. First I would build an Etsy Mini for my own store, making it the size and dimensions I want to show reclaim2fame´s listings in.

This is the code I get for that:

I copy and paste that code into a word document so I can edit it a bit later.

Now, I want to turn it into an Etsy mini for reclaim2fame´s store. All I need to do it look at his Etsy shop Policies page. The url will look something like http://www.etsy.com/shop_...user_id=5932649. The bit I need is his user id 5932649.

So I take the Etsy mini code for my store, and I replace my own Etsy id with his like this:

Code for my storeBecomes Code for reclaim2fame´s Etsy Mini

By using this technique you can create an Etsy mini for any store you like, without needing to convo the seller to ask them to build one for you.

For more information on using your Etsy Mini:
Part 1 - What is an Etsy Mini? How to build an Etsy Mini
Part 2 - How to post an Etsy Mini on your blog
Part 3 - How to post an Etsy Mini on your Facebook Page

Etsy Mini Part 3 - How to put an Etsy Mini on your Facebook Page

This is Part 3 of my tutorials on using the Etsy Mini Widget, here I will show you how to add your Etsy Mini to your Facebook Page.

For more information on using your Etsy Mini:
Part 1 - What is an Etsy Mini? How to build an Etsy Mini
Part 2 - How to post an Etsy Mini on your blog
Part 4 - How to tweak the Etsy Mini HTML code so you can feature other artists.

There are 2 ways to post your Etsy Mini on your Facebook page.
  • Using the Etsy Mini Application. This allows you to show up to 6 items from your store or your favourites. This way is relatively easy to set up.
  • Using the My Stuff Application. This allows you to more of your items in one go. An Etsy Mini of 5x4 looks great here. However it is more complicated to set this up.
Using the Etsy Mini Application
1) Click on this link to go to the Etsy Application Page
2) Click "Go to Application" and then click "Allow"
3) Once you have it installed go to your settings and choose "Application Settings"

4) Select "Etsy Shop" on the list
5) On the next page select "Edit Your Settings"
6) Here you can enter your Etsy Shop name, the number of items you want to show (the maximum is 6, and if you want to show from your favourites or your own store items.
7) When you are happy with your selection, click "Save"


8) You won't be able to see your Etsy Shop application on your profile wall yet. We need to fix this now. To do this go to your profile and click the "Boxes" Tab at the top of the page.

9) Scroll until you find your "Etsy Shop" Application. In the top right corner you will see an icon that looks like a pencil. Click it and select "Move to Wall tab"


10) Your Etsy Shop Application will now have moved to the bar on the left of your profile page. You can move it up and down by clicking and dragging the box around until you are happy with where it sits.


Using the My Stuff Application to put an Etsy Mini on your Facebook Page
1) Build an Etsy Mini that has thumbnail size images and a grid of 5 columns and 4 rows (this size looks best on your facebook page)
2) Copy the Flash Code (second box down) and save it to a word file.

3) Log into Facebook
4) Click this link to go to the My Stuff application
5) Click "go to application" and then "allow"
6) The application will appear on your page blank. At the bottom you will see a Box that says "add code"
7) Paste your Flash Code into this box and click "Add to Profile" to see it appear.

8) You can add multiple things to your My Stuff application, including other Etsy Minis, videos and anything else in HTML format. But when the My Stuff app is on your profile wall it will only show the top item. Therefore it makes sense to make sure your Etsy Mini is at the top.
9) When you are finished go to your Facebook profile. You won't be able to see your My Stuff application on your wall yet. We need to fix this now. To do this click the "Boxes" Tab on your Profile page. If you can't see it try clicking the "+" tab and look for "boxes" if you still don't see it then this is a Facebook bug, you will just have to be patient and come back to it later.

10) Now you have your boxes Tab open scroll until you find your "My Stuff" Application. In the top right corner you will see an icon that looks like a pencil. Click it and select "Move to Wall tab"

11) Your My Stuff Application will now have moved to the bar on the left of your profile page. You can move it up and down by clicking and dragging the box around until you are happy with where it sits.


For more information on using your Etsy Mini:
Part 1 - What is an Etsy Mini? How to build an Etsy Mini
Part 2 - How to post an Etsy Mini on your blog
Part 4 - How to tweak the Etsy Mini HTML code so you can feature other artists.

Etsy Mini Part 2 - How to put an Etsy Mini on your Blog

This is Part 2 of my tutorials on using the Etsy Mini Widget - here I will show you how to add your Etsy Mini to your your blog sidebar and into a post.
(This tutorial is for Blogger only, Wordpress does not support any Etsy Mini code)

For more information on using your Etsy Mini:
Part 1 - What is an Etsy Mini? How to build an Etsy Mini
Part 3 - How to post an Etsy Mini on your Facebook Page
Part 4 - How to tweak the Etsy Mini HTML code so you can feature other artists.

How to put an Etsy Mini in a blog sidebar
Blog sidebars are narrow, so you need to make sure that the Etsy Mini you build to go here is only one column wide for gallery size images or 2 columns wide for thumbnail size.

1) Once you have built the mini you want to use, copy the Javascript code (the top box) and save it in a text document. Alternatively you can just keep your Etsy mini builder open in a separate tab/window so you can come back to it later.
2) Log into Blogger
3) Click on "Dashboard"
4) Click on "Layout" this will take you to the customize page of your blog.
5) Click on "Add a Gadget"


6) A selection of Gadgets for your blog will pop up. For the Etsy Mini you need to select "HTML Gadget"
7) In the next window give your Etsy Mini a name (optional), paste your JavaScript code into the main box and click "Save".

8) You can move your Gadgets around by clicking and dragging them. When you are happy with your layout just click "Save"

- You can add multiple Etsy minis to the same gadget if you want, just paste more code underneath the first. However I think it works better to create a new html gadget for each Etsy mini, it makes it much easier when you want to move things around on your blog.

How to put an Etsy Mini in a blog post
1) Log into your blog and then click "New Post"
2) Then Click the "Edit HTML" tab

3) Paste the JavaScript code for your Etsy Mini into the box. If you click the "compose" or "preview" tab you wont be able to see your Etsy Mini. This is ok, just so long as the code is in your "Edit HTML" tab you will be able to see it on your blog when it is published.

For more information on using your Etsy Mini:
Part 1 - What is an Etsy Mini? How to build an Etsy Mini
Part 3 - How to post an Etsy Mini on your Facebook Page
Part 4 - How to tweak the Etsy Mini HTML code so you can feature other artists.

Etsy Mini Part 1 - How to build an Etsy Mini

This tutorial and the ones to follow will show you everything I know about the Etsy Mini Widget. Part 1 will introduce you to the Etsy Mini and show you how to build one.

For more information on using your Etsy Mini:
Part 2 - How to post an Etsy Mini on your blog
Part 3 - How to post an Etsy Mini on your Facebook Page
Part 4 - How to tweak the Etsy Mini HTML code so you can feature other artists.

What is an Etsy Mini?
The Etsy Mini is a clever little gadget that shows items from your Etsy store, or from your favourites. You can see 3 of them in the sidebars of this blog, for my own store, my favourites and for this weeks featured artist. The code supplied by Etsy allows you to show a little window into etsy, and no matter where you put the Etsy Mini code, it will update itself to show your most featured items, recent items or your favorites.

How to Build an Etsy Mini
To find the Etsy Mini Builder
1) Log on to Etsy
2) Click on "Your Etsy" at the top of the page
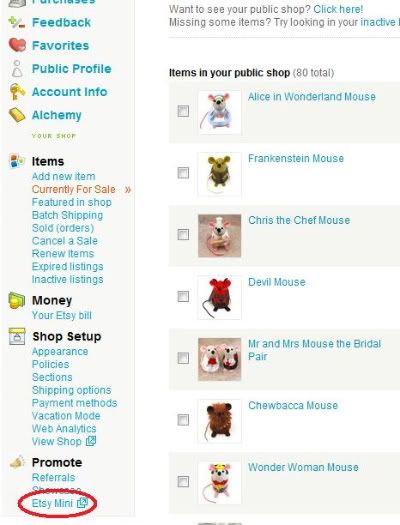
3) You will find the Etsy Mini link at the bottom of the left hand bar

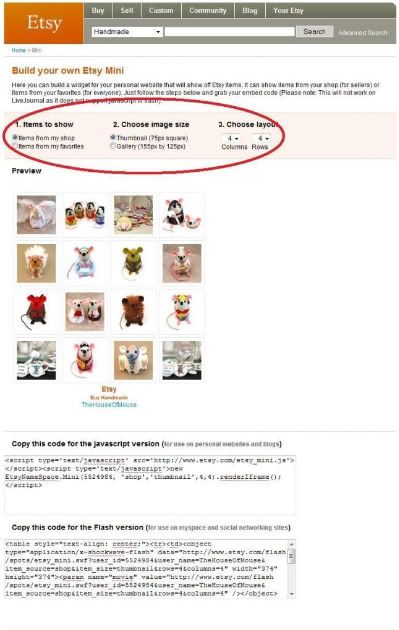
4) The Next page will give you a few options to choose from. You can choose to show items from your store or from your favourites, the size of the images and the proportions of your Etsy mini. 5) When you have made all 3 selections an example of your Etsy mini will show below, you can continue to edit it until you are happy with how it looks.

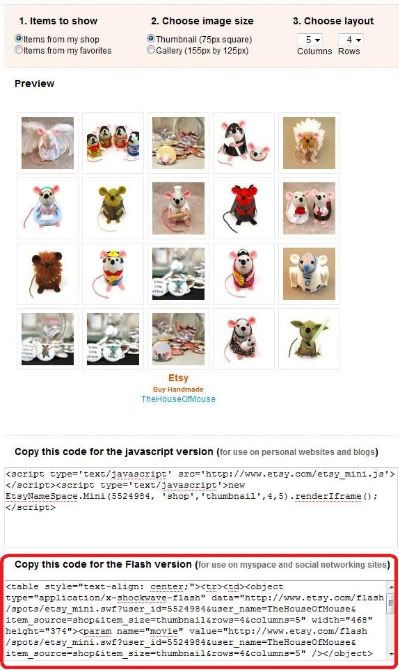
6) When you are happy with how your new Etsy Mini looks it is time to grab some code. Etsy provides 2 different codes for you to use, depending on where you want to put your Etsy mini. If you are posting the code on a blog then you will need the JavaScript code, if you are posting on MySpace or Facebook you will need the Flash Code instead.

For more information on using your Etsy Mini:
Part 2 - How to post an Etsy Mini on your blog
Part 3 - How to post an Etsy Mini on your Facebook Page
Part 4 - How to tweak the Etsy Mini HTML code so you can feature other artists.

Sunday, January 25, 2009

Etsy Sellers tip #3 - Tagging


Tags are the way your buyers find you, they are the words buyers put into the search bar on Etsy to find specific listings, so getting these right is essential.

A quick explanation on how tags work: Each individual word in a tag is searchable. If you have a tag that says "sterling silver" then your listing will be found just with a search for the word "silver". You do not have to search for all the words in a single tag for it to show up.
For example: Listing is tagged "sterling silver" and "wire wrapped"
Then the listing would be found in a search for "silver wire"

Let me take a moment to talk about the "rules" of tagging on Etsy. There is a never ending debate about this in the forms because the Etsy DOs and DONTs state very clearly that using more than one word in a tag is against the rules, but that using words that obviously go together like "sterling silver" or "navy blue" are allowed.

However, the problem comes in when you attend an Etsy Virtual labs shop critique run by an Etsy admin. Because in this situation and on more than one occasion I have heard admin say that you can put more than one color word into the same tag: like "black white red" and that you can also put words with similar meaning in the same tag: like "mouse mice rat"

I have read more than one rant about "tag abuse"* - sellers putting more than one word in a tag - in the forums, and I feel for those who stick diligently to the rules as stated in the Dos and Don'ts and watch other sellers apparently getting away with "tag abuse"*

I decided from a business perspective to tag more than one word in a tag - just so long as the words are related - as it gives me more signposts to my creations, more chances for buyers to find me. I have done this for over 6 months and Etsy has never written to me about it. If they do then I will of course change my tags, but I believe that as long as your tags are RELEVANT and SPECIFIC to the item listed then it is not tag abuse.

Things to consider when tagging:
  • Make sure you are in the right section, this is the first tag you choose. If your product is not handmade then it either belongs in "supplies" or "vintage".
  • If you are not sure what section you should be in then search for similar listings to yours on etsy and take a look at what their first tag is. If you are still not sure then go ask in the forums, you'll get a pretty quick response.
  • Once you have your first tag, Etsy will suggest others. Take a look through them and choose any ones that are RELEVANT to your listing.
  • Think about the style of what you are making, is it classic, romantic, funny, humorous, cute, steampunk, country?
  • Who is your product for? women, men, baby, children, boy, girl, adult, pets, dog, cat? Any of these words can be tags.
  • Tag for colors. If you have lots of colors in one listing then try to narrow it down to the main 2 or 3 colors of the listing or you will use up too many tags.
  • Where will your item be used? Is it designed for the kitchen, living room or bedroom? These tags only apply to some listings.
  • Use synonyms - words that mean the same thing. Like infant for young babies or purse for handbag. Just make sure the synonym is still relevant to your listing. I find using the thesaurus in Microsoft word very helpful for this.
  • Choose words that describe your item, try to think about what words someone might search for to find your work.
  • If you are in an Etsy street team that regularly makes treasuries then remember to include your team tag so they can easily find you.
  • Some sellers tag for their shop names or locations, this is allowed. However I would only do it if I had a spare tag available.
You will probably find after going thorough all this that you have waaaay too many tags, so it is time to think about narrowing them down. Choose tags that are the most likely to be used in a search. If you are not sure then experiment with changing the tags to see what gets you the most views and hearts. If you have more than one of a certain item them why not try listing them both with different sets of tags and seeing what effect that has on their views.

* IMO tag abuse is when a listing is tagged with popular search words that have nothing to do with the product.

Wednesday, January 21, 2009

Etsy Sellers Tip #2 Avatars

Your avatar is like a little advertisement of your shop. If you post in the Etsy forums it is a great way to show off your creations, which is why so many people have one of their listings as their avatar. You can use the same avatar in any of the many social networks where you can advertise your store; Twitter, MySpace, DeviantArt, Flickr, facebook, your blog etc. Every time you update your avatar every one of your posts will change to the new image, imagine all those places a little photo of your work will be showing to the world, and it's free too!

Things to consider when making an avatar
  • Chose a photo that is clear and bright, make sure that it is still easy to make out even at the small avatar size.
  • Crop it so that no space is wasted in the background.
  • Always make sure the photo is something you have available to sell, there is nothing more frustrating that seeing an item you like in an avatar only to find it sold months ago. If the listing sells, replace it with a new one to keep your avatar fresh. I know I have sold more than one listing because someone fell in love with my avatar.
  • the avatar doesn't have to be the entire object, you can focus on an attractive detail of you like, or create some curiosity by cropping it in an artistic way so buyers click to find out more.
Some people choose to use their logo as their avatar, which is a great way to brand a store, others put a photo of themselves in there. Both of these ways are equally good, but they don't spark the kind of targeted interest in what store lies beyond the avatars link. If you can get a photo of yourself with one of your items into an avatar then this makes for a very clickable combination!

Things to avoid putting into an avatar
  • Dark or badly lit images. Get those photos looking bright and colorful first. Check out this Etsy tutorial for more info on how to do this.
  • Political images - unless you sell political themed products you should separate your political views from your store advertising, they don't belong here.
  • Your pets - yes, they are cute but it is to personal for a professional looking store. Of course if you sell pet accessories or products then making your pet your avatar would be a good idea.
  • Random photos that have nothing to do with you, your store or your product. Why waste this free advertising space?

Wednesday, December 10, 2008

Etsy Sellers Tip #1 Thumbnail Photos


When someone views your store they usually do so in "gallery mode" this is when the images are the same size as the ones featured on the front page. To put your store in gallery mode just click the link for "gallery" under your shop announcement. This is your store "window", the first thing your buyers see when they come to your shop. You should try to make each thumbnail look the best it can, which means taking into account the way your first image is cropped to fit it. To get the best out of your thumbnails try to take the photo you will use for the first image as a "horizontal" rectangle, aka "landscape" so that little of the composition of the photo is lost when viewed as a thumbnail.

These thumbnail photos are also how your listings are viewed in treasuries, having a great thumbnail increases your chances of making it into a treasury and therefore your chance of making it onto the Etsy Home Page. Always make sure that the first photo for your listing is the best one from your collection!

Tuesday, June 10, 2008

A Banner Dilemma

I have been trying to come up with a new banner for my store. Not that I don't like the old one, but I feel like I need something fresher that will suit the way I photograph my mice now.

Here's what i came up with so far....


I added a border because the banner will be white on white and I wondered if it looks better with a border for the mouse to be peeking over. Of course I could do the first one with a border too... I'm undecided... what do you think?

Monday, June 9, 2008

Robin Hood Mouse

Introducing...
Little Robin Hood Mouse is going to steal from the rich and give to the poor. He needs your home to be his Sherwood Forest from which he can lead the rebellion against the evil Sheriff of Nottingham! Help Robin Hood Mouse in his crusade and gain a super cute addition to any ornament collection! Robin Hood Mouse comes complete with green hat with feather, bow, arrows and quiver!

Made of felt, silks, beads, ribbon, wood,
glue, feathers, monofilament and stuffed with polyfil.

He stands approximately 2.5inches tall (6.5cm)

Please visit my online store for more information!
www.thehouseofmouse.etsy.com


~x~

Saturday, June 7, 2008

I Love Rhubarb and Custard


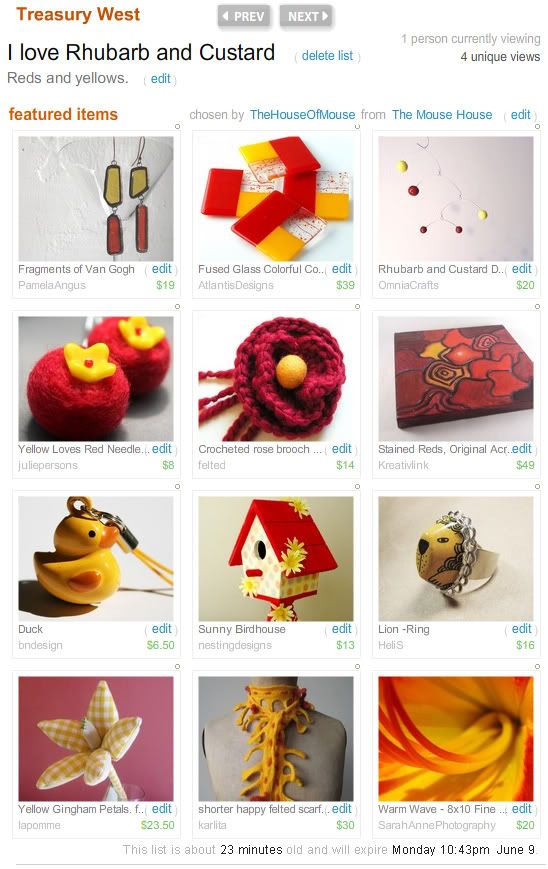
I made this treasury after being inspired by my sister-in-law's beautiful new Etsy shop OmniaCrafts you can see her mobile in the top right of the treasury. She makes the most beautiful mobiles from polymer clay and wire!

Wednesday, June 4, 2008

Mouse Burglar

Mouse Burglar!


This little Mouse Burglar needs a place to lay low after his latest bank robbery, your place would make a perfect hideout! He comes complete with black and white striped shirt, eye mask and swag bag.

Made of felt, silks, ribbon, beads, cardboard, glue,
monofilament and stuffed with polyfil.

He stands approximately 2.5inches tall (6.5cm)

All mice are hand sewn.
Costumes and accessories are not removable.

Please visit my Etsy store for more information!
www.thehouseofmouse.etsy.com


~x~

Popular Posts