Home..........About..........Online Shop..........Etsy Shop..........Folksy Shop..........Newsletter....

Showing posts with label tutorial. Show all posts

Thursday, May 21, 2009

Etsy Mini Part 4 - How to make a Featured Artist Etsy Mini

This is Part 4 of my tutorials on using the Etsy Mini Widget, here I will show you how to tweak the Etsy Mini HTML code so you can feature other artists.

For more information on using your Etsy Mini:
Part 1 - What is an Etsy Mini? How to build an Etsy Mini
Part 2 - How to post an Etsy Mini on your blog
Part 3 - How to post an Etsy Mini on your Facebook Page

It is possible to make an Etsy mini from another store, for example if you wanted to have an “artist of the week” Etsy mini on your blog. The trick is to make an Etsy mini for your own store, in the dimensions and size that you want your featured artist to have on your blog. Then you need to find their user_id and replace yours for theirs.

Here's an example. Let´s say I wanted to make an Etsy mini from this great store I found recently called reclaim2fame.etsy.com. First I would build an Etsy Mini for my own store, making it the size and dimensions I want to show reclaim2fame´s listings in.

This is the code I get for that:

I copy and paste that code into a word document so I can edit it a bit later.

Now, I want to turn it into an Etsy mini for reclaim2fame´s store. All I need to do it look at his Etsy shop Policies page. The url will look something like http://www.etsy.com/shop_...user_id=5932649. The bit I need is his user id 5932649.

So I take the Etsy mini code for my store, and I replace my own Etsy id with his like this:

Code for my storeBecomes Code for reclaim2fame´s Etsy Mini

By using this technique you can create an Etsy mini for any store you like, without needing to convo the seller to ask them to build one for you.

For more information on using your Etsy Mini:
Part 1 - What is an Etsy Mini? How to build an Etsy Mini
Part 2 - How to post an Etsy Mini on your blog
Part 3 - How to post an Etsy Mini on your Facebook Page

Etsy Mini Part 3 - How to put an Etsy Mini on your Facebook Page

This is Part 3 of my tutorials on using the Etsy Mini Widget, here I will show you how to add your Etsy Mini to your Facebook Page.

For more information on using your Etsy Mini:
Part 1 - What is an Etsy Mini? How to build an Etsy Mini
Part 2 - How to post an Etsy Mini on your blog
Part 4 - How to tweak the Etsy Mini HTML code so you can feature other artists.

There are 2 ways to post your Etsy Mini on your Facebook page.
  • Using the Etsy Mini Application. This allows you to show up to 6 items from your store or your favourites. This way is relatively easy to set up.
  • Using the My Stuff Application. This allows you to more of your items in one go. An Etsy Mini of 5x4 looks great here. However it is more complicated to set this up.
Using the Etsy Mini Application
1) Click on this link to go to the Etsy Application Page
2) Click "Go to Application" and then click "Allow"
3) Once you have it installed go to your settings and choose "Application Settings"

4) Select "Etsy Shop" on the list
5) On the next page select "Edit Your Settings"
6) Here you can enter your Etsy Shop name, the number of items you want to show (the maximum is 6, and if you want to show from your favourites or your own store items.
7) When you are happy with your selection, click "Save"


8) You won't be able to see your Etsy Shop application on your profile wall yet. We need to fix this now. To do this go to your profile and click the "Boxes" Tab at the top of the page.

9) Scroll until you find your "Etsy Shop" Application. In the top right corner you will see an icon that looks like a pencil. Click it and select "Move to Wall tab"


10) Your Etsy Shop Application will now have moved to the bar on the left of your profile page. You can move it up and down by clicking and dragging the box around until you are happy with where it sits.


Using the My Stuff Application to put an Etsy Mini on your Facebook Page
1) Build an Etsy Mini that has thumbnail size images and a grid of 5 columns and 4 rows (this size looks best on your facebook page)
2) Copy the Flash Code (second box down) and save it to a word file.

3) Log into Facebook
4) Click this link to go to the My Stuff application
5) Click "go to application" and then "allow"
6) The application will appear on your page blank. At the bottom you will see a Box that says "add code"
7) Paste your Flash Code into this box and click "Add to Profile" to see it appear.

8) You can add multiple things to your My Stuff application, including other Etsy Minis, videos and anything else in HTML format. But when the My Stuff app is on your profile wall it will only show the top item. Therefore it makes sense to make sure your Etsy Mini is at the top.
9) When you are finished go to your Facebook profile. You won't be able to see your My Stuff application on your wall yet. We need to fix this now. To do this click the "Boxes" Tab on your Profile page. If you can't see it try clicking the "+" tab and look for "boxes" if you still don't see it then this is a Facebook bug, you will just have to be patient and come back to it later.

10) Now you have your boxes Tab open scroll until you find your "My Stuff" Application. In the top right corner you will see an icon that looks like a pencil. Click it and select "Move to Wall tab"

11) Your My Stuff Application will now have moved to the bar on the left of your profile page. You can move it up and down by clicking and dragging the box around until you are happy with where it sits.


For more information on using your Etsy Mini:
Part 1 - What is an Etsy Mini? How to build an Etsy Mini
Part 2 - How to post an Etsy Mini on your blog
Part 4 - How to tweak the Etsy Mini HTML code so you can feature other artists.

Etsy Mini Part 2 - How to put an Etsy Mini on your Blog

This is Part 2 of my tutorials on using the Etsy Mini Widget - here I will show you how to add your Etsy Mini to your your blog sidebar and into a post.
(This tutorial is for Blogger only, Wordpress does not support any Etsy Mini code)

For more information on using your Etsy Mini:
Part 1 - What is an Etsy Mini? How to build an Etsy Mini
Part 3 - How to post an Etsy Mini on your Facebook Page
Part 4 - How to tweak the Etsy Mini HTML code so you can feature other artists.

How to put an Etsy Mini in a blog sidebar
Blog sidebars are narrow, so you need to make sure that the Etsy Mini you build to go here is only one column wide for gallery size images or 2 columns wide for thumbnail size.

1) Once you have built the mini you want to use, copy the Javascript code (the top box) and save it in a text document. Alternatively you can just keep your Etsy mini builder open in a separate tab/window so you can come back to it later.
2) Log into Blogger
3) Click on "Dashboard"
4) Click on "Layout" this will take you to the customize page of your blog.
5) Click on "Add a Gadget"


6) A selection of Gadgets for your blog will pop up. For the Etsy Mini you need to select "HTML Gadget"
7) In the next window give your Etsy Mini a name (optional), paste your JavaScript code into the main box and click "Save".

8) You can move your Gadgets around by clicking and dragging them. When you are happy with your layout just click "Save"

- You can add multiple Etsy minis to the same gadget if you want, just paste more code underneath the first. However I think it works better to create a new html gadget for each Etsy mini, it makes it much easier when you want to move things around on your blog.

How to put an Etsy Mini in a blog post
1) Log into your blog and then click "New Post"
2) Then Click the "Edit HTML" tab

3) Paste the JavaScript code for your Etsy Mini into the box. If you click the "compose" or "preview" tab you wont be able to see your Etsy Mini. This is ok, just so long as the code is in your "Edit HTML" tab you will be able to see it on your blog when it is published.

For more information on using your Etsy Mini:
Part 1 - What is an Etsy Mini? How to build an Etsy Mini
Part 3 - How to post an Etsy Mini on your Facebook Page
Part 4 - How to tweak the Etsy Mini HTML code so you can feature other artists.

Etsy Mini Part 1 - How to build an Etsy Mini

This tutorial and the ones to follow will show you everything I know about the Etsy Mini Widget. Part 1 will introduce you to the Etsy Mini and show you how to build one.

For more information on using your Etsy Mini:
Part 2 - How to post an Etsy Mini on your blog
Part 3 - How to post an Etsy Mini on your Facebook Page
Part 4 - How to tweak the Etsy Mini HTML code so you can feature other artists.

What is an Etsy Mini?
The Etsy Mini is a clever little gadget that shows items from your Etsy store, or from your favourites. You can see 3 of them in the sidebars of this blog, for my own store, my favourites and for this weeks featured artist. The code supplied by Etsy allows you to show a little window into etsy, and no matter where you put the Etsy Mini code, it will update itself to show your most featured items, recent items or your favorites.

How to Build an Etsy Mini
To find the Etsy Mini Builder
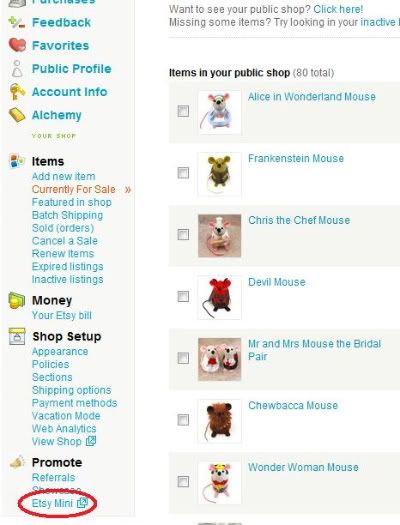
1) Log on to Etsy
2) Click on "Your Etsy" at the top of the page
3) You will find the Etsy Mini link at the bottom of the left hand bar

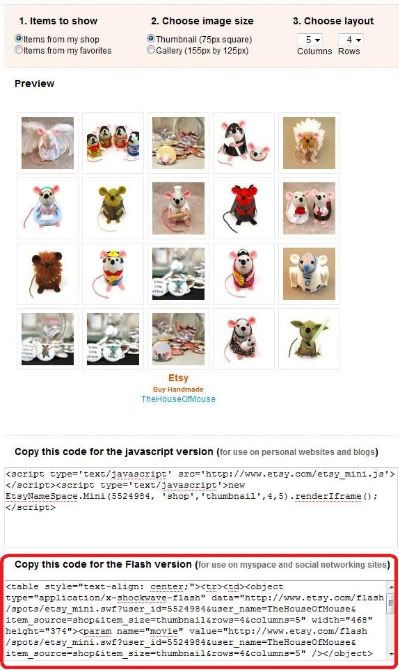
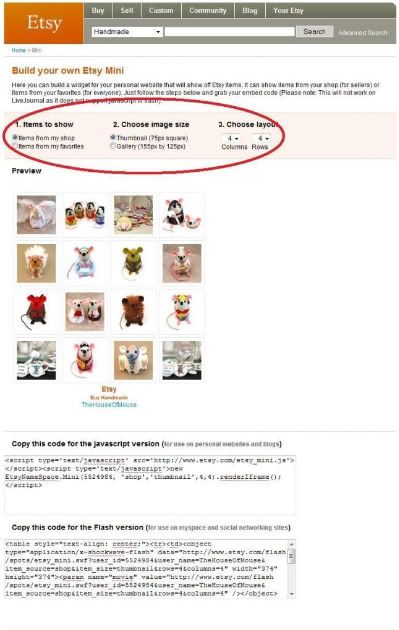
4) The Next page will give you a few options to choose from. You can choose to show items from your store or from your favourites, the size of the images and the proportions of your Etsy mini. 5) When you have made all 3 selections an example of your Etsy mini will show below, you can continue to edit it until you are happy with how it looks.

6) When you are happy with how your new Etsy Mini looks it is time to grab some code. Etsy provides 2 different codes for you to use, depending on where you want to put your Etsy mini. If you are posting the code on a blog then you will need the JavaScript code, if you are posting on MySpace or Facebook you will need the Flash Code instead.

For more information on using your Etsy Mini:
Part 2 - How to post an Etsy Mini on your blog
Part 3 - How to post an Etsy Mini on your Facebook Page
Part 4 - How to tweak the Etsy Mini HTML code so you can feature other artists.

Thursday, April 30, 2009

Etsy Sellers Tip #5 - Featured Items

Below is a tutorial on how to activate and edit the featured items in your store, if you already know how to use this feature then skip to the end of this post where you will find a couple of tips on how to use your featured items more effectively.

How to activate and edit your Featured Items

The featured items in your Etsy store allow you to show off 3 listings of your choice right at the top of your page. Unlike your other listings that are ordered by the date they were listed, these 3 are hand picked by you and seen first by visitors to your store, like a shop window.

To choose your featured items, first log on to Etsy and then click on Your Etsy at the top of the page.


Each of your active listings will be displayed here, you can select a featured item by clicking the star next to it so that it turns green. Choose at least 3 items to feature. When you have made your selection you can rank your featured items by clicking rank featured.

On the next page you can move the listings up an down as you wish. The first 3 items are the ones that will appear on your shop page, if one of them sells then it will disappear from your featured items and the 4th featured item will move up to replace it.


Tips on using your featured items more effectively

Choose more than 3 featured items. This will help you avoid a blank space when one of them sells.


Choose listings that show a variety of prices in your store. For the best effect on your sales choose the most expensive listing, the cheapest listing and one from in the middle. Most customers like to buy a middling price item - not too cheep, not too expensive - and seeing the whole price range easily like this will help them choose quickly. When I started doing this is had an immediate effect on my sales.

Use your featured items to make your Etsy Mini look like a treasury. Did you know that if you have an Etsy mini, the items in it are always from your featured items first, and then from your recently listed ones? This way you can make all your Etsy minis look beautiful no matter if they are on your blog, website, myspace, facebook or anywhere else! Choose a colour theme or show off all the items from a certain section. Change them up often to keep your viewers watching!

Leave me a comment and tell me what you think.
Do you have other tips on using your Featured Items?
I love to learn more!


OTHER NEWS:
I have an exciting announcement to make which you are going to love! But I won't tell you about it just yet... you'll have to come back tomorrow to find out!

Popular Posts