For more information on using your Etsy Mini:
Part 1 - What is an Etsy Mini? How to build an Etsy Mini
Part 2 - How to post an Etsy Mini on your blog
Part 4 - How to tweak the Etsy Mini HTML code so you can feature other artists.
There are 2 ways to post your Etsy Mini on your Facebook page.
- Using the Etsy Mini Application. This allows you to show up to 6 items from your store or your favourites. This way is relatively easy to set up.
- Using the My Stuff Application. This allows you to more of your items in one go. An Etsy Mini of 5x4 looks great here. However it is more complicated to set this up.
1) Click on this link to go to the Etsy Application Page
2) Click "Go to Application" and then click "Allow"
3) Once you have it installed go to your settings and choose "Application Settings"
 4) Select "Etsy Shop" on the list
5) On the next page select "Edit Your Settings"
6) Here you can enter your Etsy Shop name, the number of items you want to show (the maximum is 6, and if you want to show from your favourites or your own store items.
7) When you are happy with your selection, click "Save"

8) You won't be able to see your Etsy Shop application on your profile wall yet. We need to fix this now. To do this go to your profile and click the "Boxes" Tab at the top of the page.
 9) Scroll until you find your "Etsy Shop" Application. In the top right corner you will see an icon that looks like a pencil. Click it and select "Move to Wall tab"
10) Your Etsy Shop Application will now have moved to the bar on the left of your profile page. You can move it up and down by clicking and dragging the box around until you are happy with where it sits.

Using the My Stuff Application to put an Etsy Mini on your Facebook Page
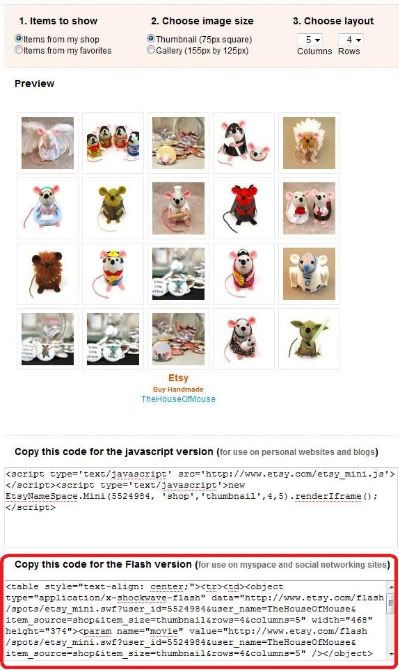
1) Build an Etsy Mini that has thumbnail size images and a grid of 5 columns and 4 rows (this size looks best on your facebook page)
2) Copy the Flash Code (second box down) and save it to a word file.
 3) Log into Facebook
4) Click this link to go to the My Stuff application
5) Click "go to application" and then "allow"
6) The application will appear on your page blank. At the bottom you will see a Box that says "add code"
7) Paste your Flash Code into this box and click "Add to Profile" to see it appear.
 8) You can add multiple things to your My Stuff application, including other Etsy Minis, videos and anything else in HTML format. But when the My Stuff app is on your profile wall it will only show the top item. Therefore it makes sense to make sure your Etsy Mini is at the top.
9) When you are finished go to your Facebook profile. You won't be able to see your My Stuff application on your wall yet. We need to fix this now. To do this click the "Boxes" Tab on your Profile page. If you can't see it try clicking the "+" tab and look for "boxes" if you still don't see it then this is a Facebook bug, you will just have to be patient and come back to it later.
 10) Now you have your boxes Tab open scroll until you find your "My Stuff" Application. In the top right corner you will see an icon that looks like a pencil. Click it and select "Move to Wall tab"
 11) Your My Stuff Application will now have moved to the bar on the left of your profile page. You can move it up and down by clicking and dragging the box around until you are happy with where it sits.
For more information on using your Etsy Mini:
Part 1 - What is an Etsy Mini? How to build an Etsy Mini
Part 2 - How to post an Etsy Mini on your blog
Part 4 - How to tweak the Etsy Mini HTML code so you can feature other artists.


